In the last part of this series, I have discussed the DDS loader implementation. Now it’s time to build on this and actually start drawing some textures onto the screen.
Overview
In this part, I am going to discuss the following:
- Asset pipeline setup
- Texture loading integration
- Debugging advice for Pixel-Perfect rendering
- Game screen drawing
All assets for this game are from the kawaii cookie match 3 asset pack. I am very thankful that the author has given me permission to include parts of this art pack for the series.
Texture Pipeline
The Asset pack provides the source data SVGs, and the game will need to load them as DDS files.
The conversion could be done manually but I always want all my assets to be stored in source format and fully automate the pipeline of making the data game ready.
The Git repository only contains the game ready data and not the source data. The pipeline is fully included in GIT so the asset pack can be used as-is.
Pipeline Architecture
For my asset pipeline setup, I am using Ninja. It’s my favorite build system. It’s small, quick, and straightforward to use.
This texture pipeline is implemented as a 2-step process:
- Export SVG to PNG
- Compress PNG to DDS
Export PNG from SVG
Exporting PNG from the source SVG files is done using Inkscape
When opening the source SVG files, you will see the pieces laid out like this:
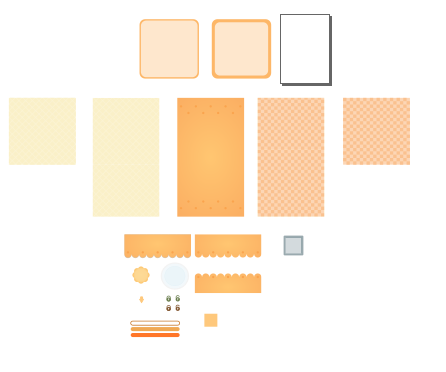
Each piece has a unique ID. This ID can be specified when doing an export, and inkspace will export that piece individually. Since the source data is resolution independent, we need to define the resolution we want to bake the results into a texture.
The export can be expressed in a straightforward form:
rule export_svg
  command = C:\Program Files\Inkscape\inkscape.com --export-dpi="48" --without-gui $in --export-png=$out --export-id="$export_id"

build tmp_data/textures/KawaiiCookieAssetPack/gameplay_background_tall.png: export_svg src_data/textures/KawaiiCookieAssetPack/SVGs/hud-pieces.svg
    export_id = g86363

build tmp_data/textures/KawaiiCookieAssetPack/gameplay_bottom_border.png: export_svg src_data/textures/KawaiiCookieAssetPack/SVGs/hud-pieces.svg
    export_id = g36017
First the export_svg rule is defined.
A rule defines a command, which is what executable and the arguments that should be passed to execute the build step.
Ninja contains support for build-in variables such as $in, $out, and custom variables such as $export_id.
The build line defines the output file on the left ($out), the rule in the middle, and the input file ($in) on the right.
Additional arguments can be defined for each build step.
With this setup, Ninja can execute the build. The steps will run in parallel if possible and use incremental compilation.
Compress PNG to DDS
The resulting PNG file are compressed to DDS. For this the compression I use TexConv.
I have a slightly modified version that adds an additional -of command line option. It’s a small code change that allows exporting to a specified output file. This way the tool fits better into the Ninja design.
The small code change can be found in my fork.
For the Ninja setup the dds compression follows the same pattern.
rule convert_to_dds_bc1
  command = ../build_environment/directxtex/texconv.exe -f BC1_UNORM -m 1 -y -of $out $in

rule convert_to_dds_rgba8
  command = ../build_environment/directxtex/texconv.exe -f R8G8B8A8_UNORM_SRGB -m 1 -y -of $out $in

build target_data/textures/KawaiiCookieAssetPack/gameplay_background_tall.dds: convert_to_dds_bc1   tmp_data/textures/KawaiiCookieAssetPack/gameplay_background_tall.png
build target_data/textures/KawaiiCookieAssetPack/gameplay_bottom_border.dds:   convert_to_dds_rgba8 tmp_data/textures/KawaiiCookieAssetPack/gameplay_bottom_border.png
Dependency tracking
With this setup, Ninja will detect that DDS compression input files are the SVG export output and will schedule them in the correct order. Next time the SVG file is changed, Ninja will detect the change, re-export the PNG, and recompress DDS’s output.
Rust Texture Setup
With all the textures exported into a game-ready format a few more steps are required to actually draw the textures as part of the game.
- load the texture from the disk
- create a D3D11 texture object
- update shader to allow sampling from a shader
- bind the texture view to the pipeline
- issue the draw calls
Loading Textures
The first step is to load the texture data from the disk. In the previous part, I described my DDS parser design that accepts a slice of the data. The same process for loading data as described in part 6 for shader loading applies here as well.
The following helper function will read the file, parse the DDS header, and create the texture. No real error handling. If a texture is missing, this will panic and crash the process.
pub fn load_dds_from_file<'a>(
    filename: &str,
    device: &'a GraphicsDevice,
) -> Result<Texture<'a>, ()> {
    // load the texture data
    let data = std::fs::read(filename).unwrap();

    // parse the header
    let texture_load_result = dds_parser::parse_dds_header(&data).unwrap();

    create_texture(
        device,
        texture_load_result.desc,
        texture_load_result.subresources_data,
    )
}
Texture Interface
Each texture has an ID3D11Texture2D and a Shader Resource View (SRV) that allows it to be bound to the pipeline. Both the texture and the ShaderResourceView have lifetime annotations so that the lifetimes can be validated.
pub struct ShaderResourceView<'a> {
    pub native_view: &'a mut winapi::um::d3d11::ID3D11ShaderResourceView,
}

impl Drop for ShaderResourceView<'_> {
    fn drop(&mut self) {
        leak_check_release(self.native_view, 0, None);
    }
}

pub struct Texture<'a> {
    pub native_texture: &'a mut winapi::um::d3d11::ID3D11Texture2D,
    pub srv: ShaderResourceView<'a>,
}

impl Drop for Texture<'_> {
    fn drop(&mut self) {
        leak_check_release(self.native_texture, 0, None);
    }
Texture creation
Texture creation is shown below. It’s only calling the necessary D3D11 API calls. Same Rust patterns as discussed in previous parts apply here as well.
pub fn create_texture<'a>(
    device: &GraphicsDevice,
    texture_desc: D3D11_TEXTURE2D_DESC,
    subresources_data: Vec<D3D11_SUBRESOURCE_DATA>,
) -> Result<Texture<'a>, ()> {
    let mut texture: *mut winapi::um::d3d11::ID3D11Texture2D = std::ptr::null_mut();
    let mut texture_view: *mut winapi::um::d3d11::ID3D11ShaderResourceView = std::ptr::null_mut();

    unsafe {
        let hr =
            device
                .native
                .CreateTexture2D(&texture_desc, subresources_data.as_ptr(), &mut texture);

        if hr != S_OK {
            return Err(());
        }

        // create a resource view
        let hr = device.native.CreateShaderResourceView(
            texture as *mut winapi::um::d3d11::ID3D11Resource,
            std::ptr::null_mut(),
            &mut texture_view,
        );

        if hr != S_OK {
            return Err(());
        }
    }

    Ok(Texture {
        native_texture: unsafe { texture.as_mut().unwrap() },
        srv: ShaderResourceView {
            native_view: unsafe { texture_view.as_mut().unwrap() },
        },
    })
}
Drawing Pixel Perfect Textures
Now that we have the necessary functionality to load, we still need to draw the textures.
Coordinate system
I defined my “Game-Space,” aka World Space as
X-Axis: To the right Y-Axis: Going up
I want my sprites to be pixel-perfect and always be drawn aligned to the pixel grid. Therefore I decided to use pixels as my units.
There are a few articles on how to archive pixel perfect sprite rendering with Unity and UE4 but I could not find one if you are writing your own rendering logic.
The core of the solution is this. Each vertex needs to be aligned to a pixel on the output grid. For me, the solution is simple:
float4 TransformWorldToScreen(int2 world_space_pos)
{
    float2 screen_space_pos = float2(
        (world_space_pos.x / ScreenWidth) * 2 - 1,
        (world_space_pos.y / ScreenHeight) * 2 - 1);

    return float4(screen_space_pos, 0, 1);
}
world_space_pos is in pixels and, therefore, always aligned to the grid. If another unit is used, it’s essential to make sure that screen_space_pos always refers to positions aligned to the screen’s pixel grid.
Here are a few pointers on how to make sure your rendering is correct.
Debugging advice
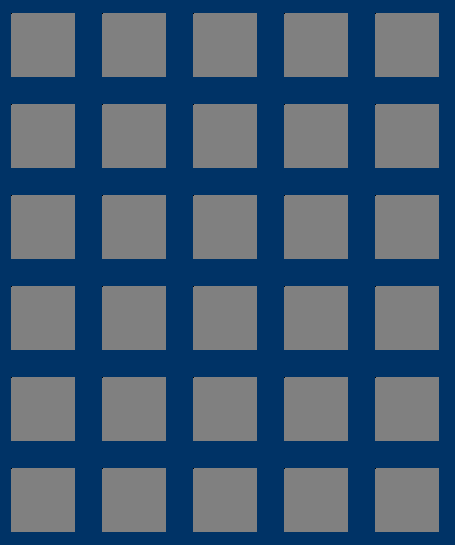
Create a 64x64 black and white checkerboard.
Such as this:

Draw this texture onto a quad of the same size and use linear texture sampler.
With linear sampling, blending will occur between neighboring pixels if they are not perfectly aligned to the pixel grid. Doing this will highlight any errors that might occur in the calculation.
The result on screen should show the checkerboard pattern.
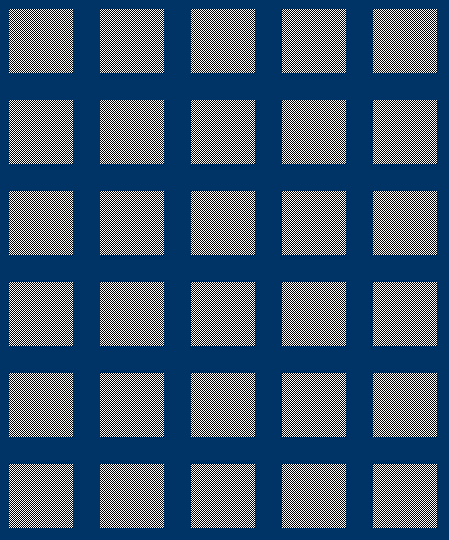
If you take a magnifying glass or enlarge this image, you should still see the checkerboard. Without any repeating or skipped pixels anywhere on your quads.
If the pattern turns into anything else, such as a gray quads. Something went wrong along the drawing pipeline
There can be a lot of reasons, you might be applying half a pixel offset, rounding incorrectly, projecion doesn’t match the windows size etc
Drawing the game
Now we have all the ingredients to draw the base of the game:
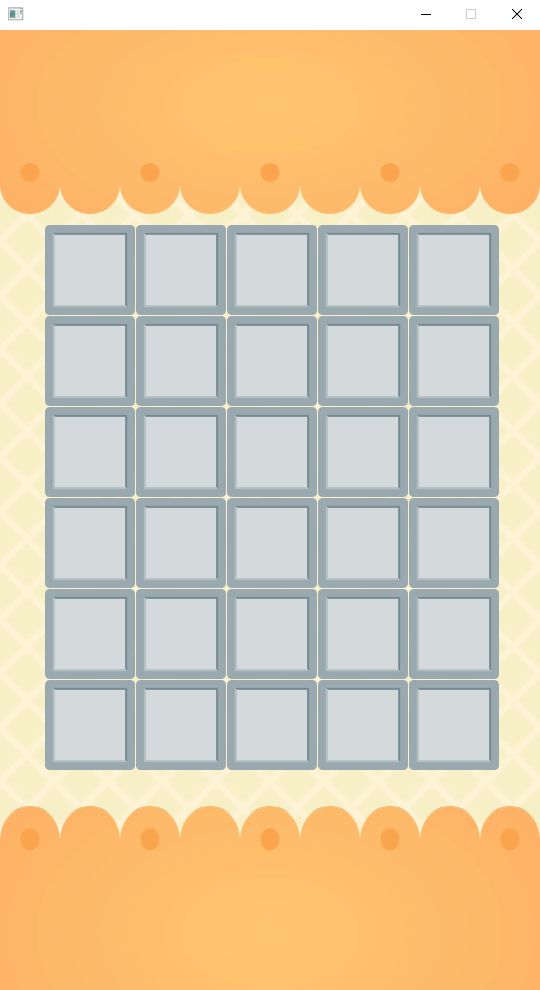
The state of the item grid is stored as a 2-dimensional array of booleans right now. 6 rows, each with 5 entries for each row
pub struct GameplayStateFrameData {
    // the state of the grid
    grid: [[bool; 5]; 6],
}
We can then use Rust iterators to iterate over the whole grid. With .enumerate() we get access to both the index and the value.
This is useful in a case like these where both the value and the index are required for the logic. In this example, the index is used to calculate the position. The boolean values decide the color of the quad.
for (y, row) in frame_params.grid.iter().enumerate() {
    for (x, column) in row.iter().enumerate() {
        let x_offset_in_pixels = (x * 91) as i32;
        let y_offset_in_pixels = (y * 91) as i32;

        // allocate the constants for this draw call
        let obj_alloc = HeapAlloc::new(
            GameSpaceQuadData {
                color: if !column {
                    Float4 {
                        x: 1.0,
                        y: 1.0,
                        z: 1.0,
                        a: 1.0,
                    }
                } else {
                    Float4 {
                        x: 0.0,
                        y: 1.0,
                        z: 0.0,
                        a: 1.0,
                    }
                },
                size_pixels: Int2 { x: 90, y: 90 },
                position_bottom_left: Int2 {
                    x: 45 + x_offset_in_pixels,
                    y: 960 - 330 + 45 - y_offset_in_pixels,
                },
            },
            gpu_heap_data,
            gpu_heap_state,
        );

        bind_constant(command_list, 0, &obj_alloc);

        draw_vertices(command_list, 4);
    }
}
With all this put together, we now have the drawing logic setup for the game. The game flow is in-place. We can swap between different game screens, react to player input, and draw the game world.
Next Part
The next part will be all about implementing the actual Match 3 mechanics.
The code is available on GitHub
